

What if a wet wash creates more risk than it removes? For some dry products, water can leave moisture in hard-to-reach areas, while a dry method may not remove sticky or oily residue. The right approach depends on the material, blender design and process requirements. A clean-looking vessel can still hold residue beneath ribbons, around shafts and seals, in corners or at the discharge point. Knowing how to clean a ribbon blender means choosing a method that removes the relevant residue without introducing contamination, moisture or equipment damage.
A repeatable procedure starts with safe preparation and the equipment manufacturer’s instructions. Then match dry, wet or automated cleaning to the residue and the blender’s configuration, followed by a careful inspection of potential retention points. This guide explains how to prepare, clean and inspect a ribbon blender, and how design features can affect access and cleaning effort. The aim is to reduce carryover risk without adding unnecessary steps.
Start by defining what the cleaning must achieve. A routine product changeover may require removing visible carryover, while product recovery, sanitation or a documented process requirement may call for different steps and acceptance criteria. Record the objective before work begins so operators know what “clean” means for the task and what evidence is required before the blender returns to production.
Next, review the blender manufacturer’s manual and the site procedure. Confirm approved access points, cleaning tools and methods, chemical compatibility, and any restrictions on water, steam or disassembly. Check the next product’s requirements as well as those of the product being removed. If the cleaning agent, residue or acceptance criteria are uncertain, resolve that through the site’s established process before opening the equipment.
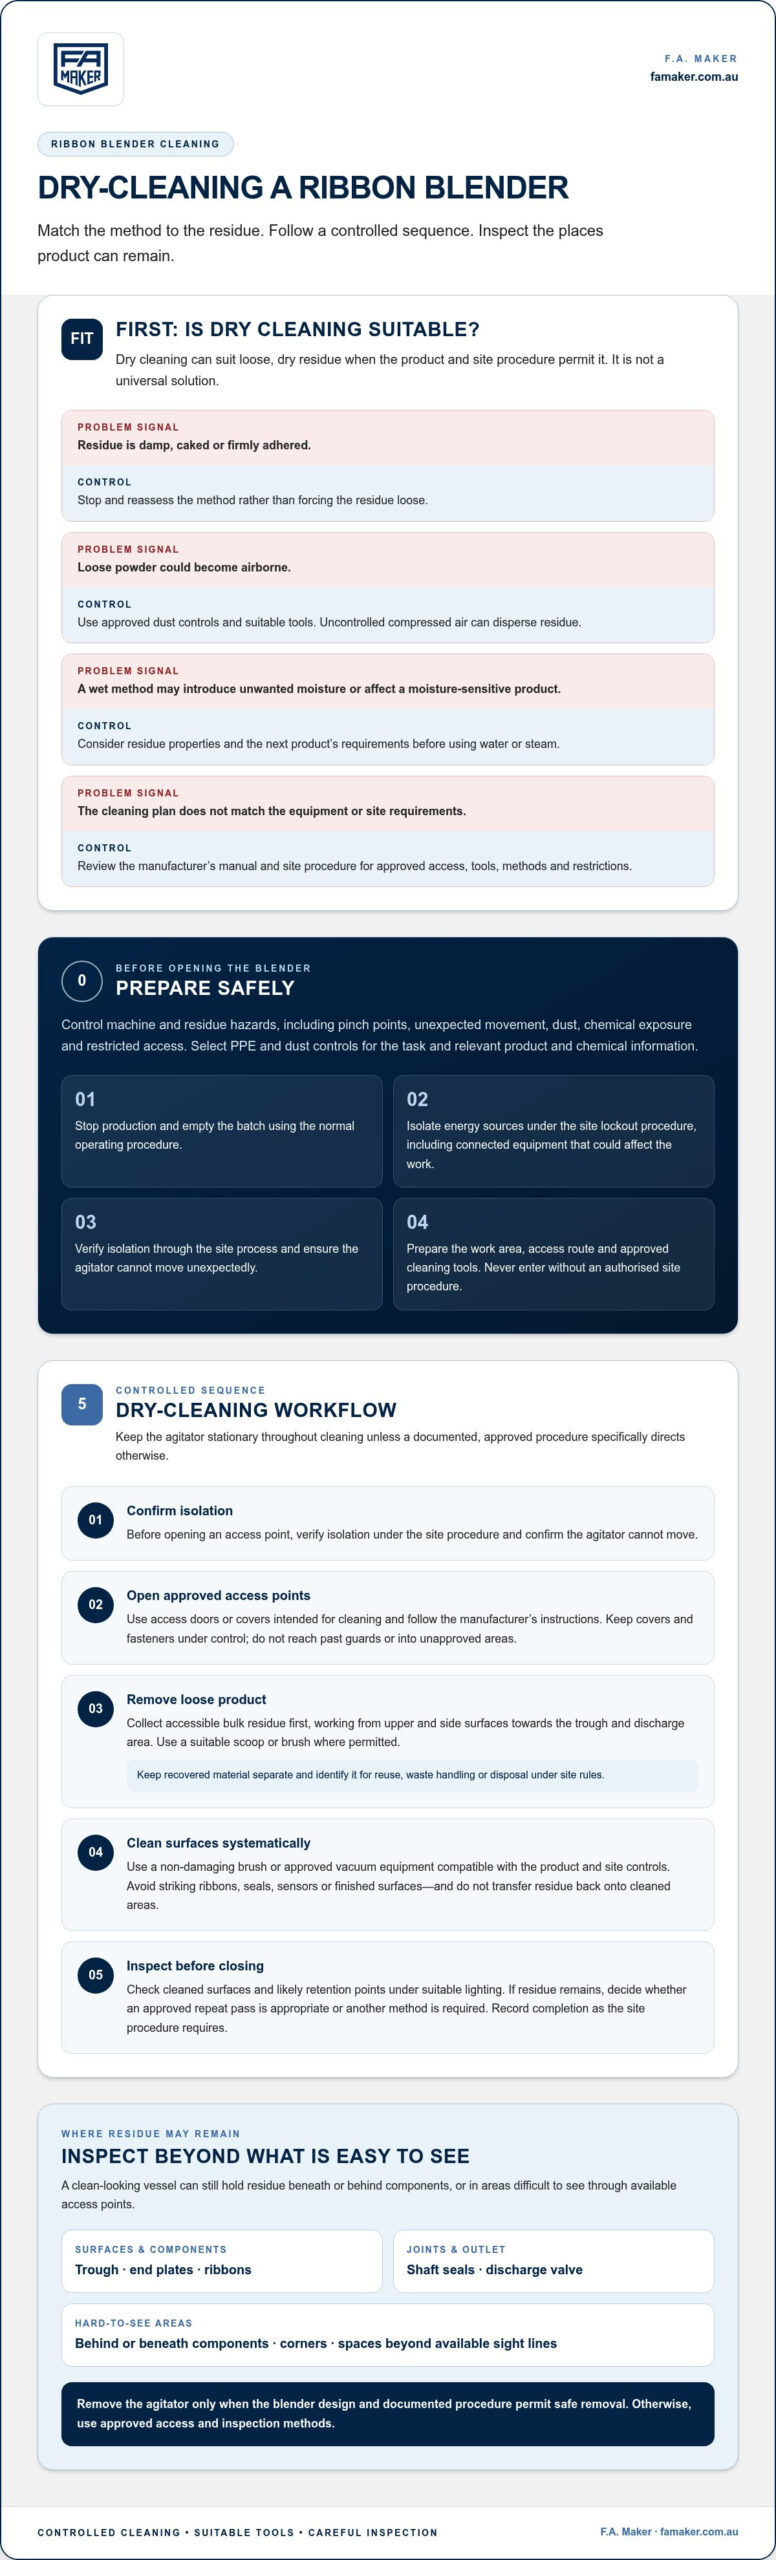
Residue behaviour and blender geometry determine where product may remain and how it can be removed. Include the trough, end plates, ribbons, shaft seals and discharge valve in the inspection plan. Pay particular attention to spaces behind or beneath components and to areas that are difficult to see through the available access points.
Use this assessment to identify likely retention points, not to assume every surface is accessible. Remove the agitator only if the blender design and documented procedure permit safe removal. Otherwise, use approved access and inspection methods.
Before cleaning, control the hazards associated with the machine and the residue. Consider pinch points, unexpected agitator movement, dust, chemical exposure, restricted access and any entry restrictions. Select the required site PPE and dust controls based on the task and relevant product and chemical information. Never enter the blender without an authorised site procedure.
These checks establish safe conditions for deciding how to clean a ribbon blender. If the actual residue, equipment configuration or required cleanliness differs from the plan, pause and reassess before proceeding.
Dry cleaning can suit loose, dry residues when the product and site procedure permit it. Work in a controlled order so removed material doesn’t fall onto surfaces already cleaned or become airborne. The sequence below explains how to clean a ribbon blender without treating dry cleaning as a universal solution. If residue is damp, caked or firmly adhered, stop and reassess the method rather than forcing it loose.
Select tools for the residue and equipment, not simply for convenience. A brush should reach the target area without scratching or bending components. Vacuum equipment must be approved for the material, with dust controls in place. Uncontrolled compressed air can lift fine powder into the air, deposit it on nearby equipment or spread it beyond the work area. Work gently around crevices and component interfaces.
Make a deliberate check at end plates, shaft entry points, ribbon clearances, trough corners and discharge-valve interfaces. These locations can retain material outside the operator’s normal line of sight. Use approved lighting and inspection tools to view accessible areas. Don’t move the agitator to improve visibility unless the documented procedure specifically allows it and controls the associated risk.
Keep the removed product contained throughout the task. Don’t return recovered material to production unless the site’s product controls allow it. If residue is lodged behind a component or cannot be safely reached through approved access, don’t improvise with tools or disassembly. Record the finding and follow the site’s escalation procedure.
Repeated difficulty reaching residue can point to a mismatch between cleaning needs and blender access or geometry. Reviewing industrial mixers and blenders against the required cleaning method can help inform an equipment assessment.
The right method depends on the residue, required cleanliness outcome and blender configuration. Loose powder may come away with dry tools, while a water-soluble deposit or adhered film may need a wet method. Neither water nor steam is automatically suitable: moisture can affect sensitive product, and cleaning agents or process conditions must be compatible with equipment materials. Use the manufacturer’s instructions and a validated site procedure to decide.
| Method | May suit | Limitations to assess |
|---|---|---|
| Dry cleaning | Loose, dry residue where avoiding added moisture is important and dust controls are suitable. | May not remove caked, oily or sticky deposits; dust can spread if collection is poorly controlled. |
| Manual wet cleaning | Residue that responds to the approved detergent and rinse process, including some dried deposits or films. | Requires safe access, suitable materials, drainage and thorough drying, including checks for trapped moisture. |
| Clean-in-place (CIP) | Blenders and installed systems designed to clean internal surfaces without routine manual access. | Effectiveness depends on spray coverage, device suitability, flow and pressure, plus compatible pump capacity and a validated cycle. |
Dry cleaning can be appropriate for loose, free-flowing residue when the site can collect dust effectively and prevent transfer to nearby equipment or product. It avoids introducing water, but it isn’t a reliable answer for every deposit. Material that has caked, become sticky or formed a film may remain attached despite brushing or vacuuming. Confirm that the collection equipment and cross-contamination controls suit both the product and workplace before proceeding.
Consider manual wet cleaning when the residue responds to water or an approved detergent and the equipment can be drained and dried as required. Plan the complete sequence, including soil removal, detergent application, rinsing, drainage and drying. Inspect crevices and low points for trapped moisture before release. Steam also requires an explicit compatibility assessment. It shouldn’t be treated as a shortcut for a wet-cleaning procedure.
CIP is only a sound choice if the spray device reaches relevant surfaces and the installed system can deliver the required flow and pressure. Ribbons, shafts, covers and discharge geometry can create areas with limited spray access. A validated site procedure should set the detergent, rinse, drainage and drying parameters rather than relying on assumed cycle settings. Verify performance against the process requirements.
When deciding how to clean a ribbon blender, compare methods against the residue and the machine rather than selecting the option that looks quickest. If cleaning requirements prompt an equipment review, access, geometry and provisions for the intended method are useful criteria for comparing industrial mixers and blenders.
Cleaning is complete only when the required inspection and verification steps are satisfied. Visual inspection can identify visible residue or pooled liquid, but it doesn’t replace additional checks required by the product, site procedure or quality plan. Define the acceptance criteria for the changeover before cleaning, rather than improvising them afterwards. This control makes the process of how to clean a ribbon blender repeatable and provides a clear basis for equipment release.
Keep the blender isolated while inspecting. Use only safe, approved access points and suitable lighting or inspection tools. Check product-contact surfaces and areas where residue or moisture could remain. Look for visible cleaning-agent traces and pooled liquid where relevant to the method used. Also assess accessible seals and discharge interfaces for accumulated material or signs of damage.
Don’t treat an inaccessible or uncertain area as verified clean. Record the limitation and follow the site’s escalation process. If the procedure requires a swab, analytical check or other test, use the specified method and sampling locations. Judge results against the criteria set for that product and process, not a universal threshold.
A controlled checklist gives each operator the same sequence and makes exceptions visible. It should identify the blender and changeover, the approved cleaning method and tools, and the person responsible for carrying out and reviewing the task. Site quality requirements determine what verification is needed and who can authorise release.
For each cleaning event, record:
If residue remains or a check fails, document the finding, complete the corrective action under the site procedure, then repeat the relevant inspection or verification before release. A record that says only “cleaned” doesn’t show what was checked or how an exception was resolved. Consistent details help the site review recurring residue locations and assess whether access or equipment design is affecting cleaning effort.
If changeover findings prompt an equipment review, explore industrial mixers and blenders with attention to accessible surfaces, residue-retention points and the cleaning method your process requires.
Cleaning needs are part of equipment selection, not an issue to address only after installation. A blender that suits the product and production rate may still create avoidable changeover work if key surfaces are difficult to access or residue collects around the discharge. Before selecting or replacing equipment, compare the cleaning method your process requires with the blender’s geometry, materials, access points and cleaning provisions.
Start with the products and changeovers the blender must handle. Consider whether residues are loose, sticky, oily or moisture-sensitive, how often products change, and whether the established process uses dry cleaning, manual wet cleaning or CIP. Then assess the equipment against that operating pattern. A design that is straightforward to inspect after one product may be less practical for frequent changes involving tenacious residue or strict moisture controls.
Assess how much of the product-contact area is visible and reachable through approved access points. Look at trough and end-plate geometry, weld profiles and transitions between surfaces. These details can affect whether residue is easy to identify and remove or likely to remain in crevices and other retention zones. Consider the discharge-valve arrangement too, including whether its interface may hold product after emptying.
Agitator complexity matters. Ribbons, clearances and any provision for component removal should suit the site’s documented cleaning procedure and the capability of the people carrying it out. Don’t assume that a removable component is practical to take out routinely: the procedure, safe access and handling requirements all need to fit the operation. Likewise, CIP suitability depends on the installed cleaning provisions and coverage of relevant surfaces, not simply the presence of a spray device.
An equipment review may be warranted if inspections repeatedly find residue in the same locations, if key surfaces cannot be reached through approved access, or if cleaning requirements have changed. Compare recurring difficulties with the blender’s capacity and process fit, as well as maintenance access and installation constraints. For a replacement or process change, consider the whole operating requirement rather than selecting on cleanability alone.
These criteria help turn cleaning experience into practical equipment requirements. For broader considerations when assessing pre-owned equipment, use this guide to used industrial mixers and blenders. F.A. Maker supplies ribbon blenders and other industrial mixers, giving processors equipment options to consider when cleaning requirements form part of an equipment review.
In short, how to clean a ribbon blender is shaped in part by the design selected. Matching residue behaviour, cleaning method and operator access to the equipment can make inspection and changeover planning more deliberate.
A cleaning procedure works best when it fits the blender as well as the product. If recurring residue or difficult access is prompting a process review, use those findings to define what future equipment needs to accommodate. Consider changeover frequency, cleaning method, inspection access and how the blender will fit into your operation. These requirements can help shape a practical equipment decision instead of relying on assumptions about how to clean a ribbon blender.
F.A. Maker is a family-owned and operated business spanning several generations, founded in the 1920s, and supplies industrial mixers, blenders and ribbon blenders. That history informs its focus on processing equipment and the requirements of industrial operations.
Explore F.A. Maker’s industrial processing equipment as you consider the right fit for your process. A clear view of cleaning needs can help you make a more informed equipment decision.
Clean it at the intervals set by your product changeovers and site procedure. A change from a strongly coloured or flavoured ingredient to a light, neutral product may need a different cleaning response from a repeat batch of the same product. Define the required clean for each changeover in the relevant procedure, then adjust it through the site’s change-control process if products, residues or quality requirements change. This gives operators a consistent basis for deciding how to clean a ribbon blender.
Yes, if water is suitable for the residue, product and blender materials, and the approved cleaning procedure accounts for drainage and drying. For example, a water-soluble residue may respond to a wet method, while a moisture-sensitive powder may be affected by residual dampness. Confirm material compatibility and the next product’s requirements before washing. Don’t assume that water or steam is safe for every machine, seal or process.
It can be cleaned in place if the blender and installed system are designed for that method and the cleaning process reaches the surfaces that require cleaning. A spray device alone doesn’t establish effective coverage. Consider whether the ribbons, shaft areas, vessel geometry and discharge receive the required exposure, and whether the system can deliver the validated cycle. Confirm the procedure’s performance and inspection requirements before relying on CIP for a changeover.
Use the approved method suited to the deposit rather than forcing it off with hard tools. Check whether the residue responds to a compatible detergent or another documented cleaning approach, and allow for the equipment’s materials and finish. Aggressive scraping can damage surfaces or seals and create new areas for residue to collect. If the deposit remains beyond safe reach, stop and follow the site’s procedure for escalation or further cleaning.
Not by default. A compressed-air jet can disperse fine product dust, move residue onto adjacent equipment and increase exposure in the work area. It may also drive particles into seals or other hard-to-inspect spaces. Use it only if the site procedure specifically permits it and suitable controls are in place for the product and workplace. An approved vacuum or controlled brush may be more appropriate for loose dry material.
Follow the drying and release criteria in the product-specific procedure. Before the next batch, moisture may need to be absent from product-contact areas, particularly if the incoming material is moisture-sensitive or the process requires dry surfaces. Don’t rely only on a quick view of the trough: droplets can remain at low points, joints or around the discharge. Record any required dryness check before the blender is released.
Areas outside a direct line of sight are easy to overlook, particularly behind ribbon flights, at shaft entry points, along end plates and around discharge-valve interfaces. Product can also remain in clearances and corners after the main vessel looks empty. Use the equipment’s inspection points and suitable lighting to check these locations safely. If a surface can’t be seen or reached using approved access, don’t assume it’s clean.